

In this article, I’ll show you some of my favorite hip mobility exercises to help you improve your overall hockey performance.
A hockey player is bent over at the waist for pretty much the entire game: when striding, during a face-off, when taking a shot, and even while sitting on the bench. After the game, most hockey players go home and sit at the table, on the couch, or at the computer. All these situations create a bent-over position for most of the day, both on and off the ice.
Bending over at the waist shortens and tightens the hip flexors, which can lead to a host of postural issues, including pain in the hips during movement, hip tightness, rounded shoulders, shoulder impingement, lower back lordosis, and a forward lean in the neck. These issues are common for hockey players and should be addressed as soon as dryland hockey training begins.
Posture correction is extremely important, as a healthy posture increases your power output and reduces your susceptibility to injury. So let’s talk about how to keep it from becoming an issue.
Strength Training and Flexibility
Proper resistance training can—and should—also increase your flexibility.
The idea that lifting weights will tighten you up over time is only true if you train that way. If you train like a hockey athlete, lifting weights will enhance mobility, among many other things.
In addition to the above issues, chronic bending over at the waist causes the pelvis to rotate forward, creating lordosis (an inward curve of the lower back). This shows up a lot if you perform a barbell overhead squat.
Lordosis can affect the core muscles’ ability to fire properly—and if your core is not up to par, your ability to produce power takes a negative hit. Core strength is critical for transferring power from your lower body to your upper body.
This negative hit can come in the form of poor posture and tight hips; and poor posture and tight hips means you’ll never be able to do mohawk turns or move fluidly out on the ice.
Targeting the Hip Musculature
You’ll need to pay attention to these muscles if you want to unlock your hips to increase your hockey performance:
- Gluteus medius (the largest muscle on the outer sides of the hips)
- Gluteus maximus (the primary extensor muscle for the hips)
- Hip flexors (a group of muscles on the front of the hips responsible for hip flexion)
Essentially, you want to cover the front, back, and sides of the hips for the most complete results.
There are many deep muscles found within the hips that are relevant to hockey training as well, which are also addressed with the hockey hip mobility exercises below.
Unilateral Exercises for Hockey Players
Hockey is a unilateral sport, which means you rely on only one side of your body during many of the movements: for example, strides are only taken with one leg; you only ever shoot on one side of your body; and when you turn, all of the weight is on one leg.
Unilateral exercises help you stay structurally balanced and avoid relying too much on a “dominant leg,” so you can be explosive no matter which leg you propel off.
Bilateral exercises (both legs) won’t target your hip stabilizers or ankle stabilizers the same way unilateral exercises do, so when we can find an exercise that targets so many different areas (such as the T-stand) and is also unilateral, I’m all over it.
My Favorite Hockey Hip Mobility Exercises
Every hockey player can benefit from improving their hip mobility/stability, even if they don’t currently have any hip concerns.
Stretching and strengthening the muscles in this area helps build stability and flexibility so you can skate faster, become more agile, and dramatically lower your injury risk.
With so many hip exercises out there, it can be hard to know which ones are right for hockey players. But I’ve got you covered… check out the exercises and descriptions below so you can target hip issues head-on.
1. Iron Cross
The iron cross aims a little higher on the kinetic chain than where the hips are directly located.
It primarily focuses on lumbar and thoracic spine mobility and greatly reduces the tension and pressure that exacerbate lower-back pain (which can then translate into hip tightness).
Often, where you feel the pain/tightness has nothing to do with the root cause. Pain/tightness is a compensation mechanism the body uses because something else isn’t doing its job properly.
This exercise is first on the list for a reason: it’s likely my all-time favorite hip exercise because it checks so many boxes at once.
2. Rocking Frog Stretch
If you have played hockey for any reasonable length of time, you’ve probably known someone who’s pulled their groin. It’s a painful injury that can sideline any hockey player for weeks and leave them very frustrated.
Injured groins not only take a lot of time to heal, but they are also difficult to heal—even for the most skilled practitioners. The frog stretch is designed to improve the strength and mobility of that difficult-to-target area.
It can also be a game-changer for your stride length.
3. Seated Piriformis Stretch
The piriformis is a muscle located right behind the gluteus maximus.
Aggravation of this muscle can travel up and affect the sciatic nerve, causing pain and tingling down through the hips, legs, and feet. This stretch will help lengthen this small but important muscle.
4. Seated Glute Stretch
The seated glute stretch targets the major glute muscles and several deeper hip muscles that need to stay mobile, since the glute has so many attachments around the hip capsule.
5. Rear Foot Elevated Hip Flexor Stretch
This movement provides a deep leg stretch that hits the hip flexors, glutes, and thighs all at the same time—it even includes the quadriceps, which have multiple attachments at the hips as well.
This is a perfect exercise to do pre-game to loosen up, or if you’re about to do barbell back squats.
6. Split Squats
If you struggle with lunges (have knee or hip pain, or suffer from debilitating muscle soreness), the split squat is an excellent substitute. And whether you load this movement or not, it is an extremely effective sagittal plane hip mobility exercise.
If you struggle with lunges, a full mesocycle (4–8 week program) with zero lunges and only split squats can be a great way to build your ability to handle lunges.
Bodyweight-only split squats are easy to incorporate into your warm-up or do a few sets of on non-training days. Then, on lower-body training days, you can do the same movement with resistance.
If you have hip mobility and/or stability issues, daily split squats can be a great exercise for you. As famous strength coach Dan John once said, “If something is important, do it every day.”
7. Cossack Squats
Cossack squats are an excellent hip mobility exercise within the frontal plane of movement. They also act as a great precursor to lateral lunges for many of the same reasons that split squats are a great precursor for forward lunges.
I frequently use cossack squats in our YouTube videos, warm-ups, and programs here at HockeyTraining.com, as many hockey athletes have restricted front plane hip mobility—and yet so much lateral muscle recruitment is required to become a fast and explosive skater.
8. T-Stands
T-stands target several different areas that are often problematic for hockey athletes, such as their hips, glutes, lower back, core strength, ankle stability, posture, and overall balance.
This is a particularly excellent exercise for the hips because it strengthens so many muscles directly around the hips (located within the deep hip muscles, core, lower back, and glutes) and not just the hips themselves.
How The Core Effects Hip Mobility
In this section, I’ll show you how important your core strength is for hip mobility, and how improving it will boost your skating speed and help with mohawk skating techniques.
When you look at the body’s structure from a functional and anatomical perspective, it’s hard to argue with the deep interplay between core stability and hip mobility.
How your body experiences its internal environment determines how you move in the external environment.
For hockey athletes, the hips are a crucial element.
The spine needs stability to move properly. Essentially, stability signals to the body that it’s safe to move the spine because we’re well protected.
But if the core isn’t stable enough for the job, the spine will change position and try to use something else to provide the stability needed.
When the spine has to do this, it typically means the hip, hamstring, and mid-back will “turn on” and tighten during movement to try to stabilize the area.
You know those chronically tight hip flexors you’re always dealing with?
Yeah, those unsurprisingly attach to the spine – and if you have a weak core, you’ll get your hip flexors trying to hold your spine together.
They will stay as tight as possible for as long as they need to in order to maintain that stability – your body is going to prioritize spine safety ten times out of ten.
Think of it this way.
A spine with a weak core is like a goal-scorer with no puck handling skills.
Sure, he can score a goal, but he’s going to need his teammates to set him up every single time in order to actually make it happen.
But, without that set up, he’s useless on the ice. He needs to find a man to set him up every single time.
This is actually a really great way to think about the body.
No matter what happens to it, it will always find a way to compensate (or, always find another muscle group to “set them up”).
We have all seen someone limp, have a forward head lean, or have terrible posture, and we instantly think:
“Jeez that can’t be comfortable”
But, these are ways in which the body reduces pain/strain on one joint in the body to get the individual to feel the least amount of pain and be as efficient as possible, even if it’s not ideal.
This is compensation at work.
Compensations are very simply the most efficient, least painful way to get things done.
Enter: Hip Function
Diving specifically into the hips, there is no reason hockey athletes should be suffering as many restrictive mobility issues as they do.
Structurally, it’s an open ball-and-socket joint and it can go through a massive range of motion before it ever reaches its actual end range of motion to a bone or capsular ending.
The ease of motion is aided further by synovial fluid to reduce friction, thick cartilaginous lining, a strong but flexible labrum, and positioning on the side of the pelvis to allow the greatest range of motion through multiple planes of movement compared to if it were simply in a hinge formation like the knee or elbow.
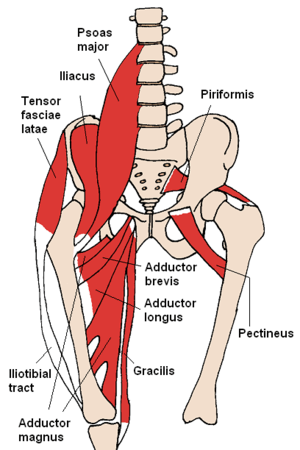
To be perfectly honest, hockey athletes should be able to do the splits – or at least get really close to the floor.
The splits shouldn’t be some unknown land that only gymnasts and dancers can enter, the hip joint as a ton of available motion in it – provided it’s not purposefully holding tension in the hopes of compensating for somewhere else in the body.
So What Can Help My Tight Hips?
Well, it’s a multi-faceted question.
Tightness normally means a couple of things:
- If I were to move your hip around through a simple passive assessment, you should have no restrictions in any direction because there isn’t any muscle tension holding it back, or at least there shouldn’t be any muscle tension.
2. If you’re tight in only one or two specific directions, that shows that there may not be any specific structural limitations, but most likely a stability restriction.
Let’s say you can perform a standard Thomas test, where you bring your knee to your chest and let the opposing leg hang down, checking to see what kind of available hip motion you have through the sagittal plane.
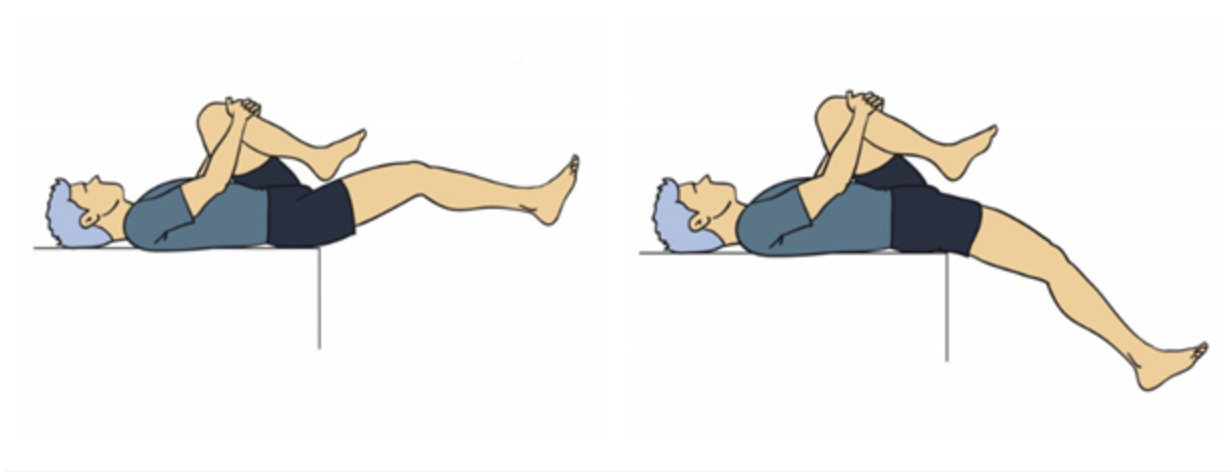
If you can hold your knee to your chest and have your opposite knee/lower hamstring comfortably touching the table – you’re good to go.
Now comes the alternative part…
Let’s say you pass the Thomas test with no problem at all, but, you have a serious problem with your rotation.
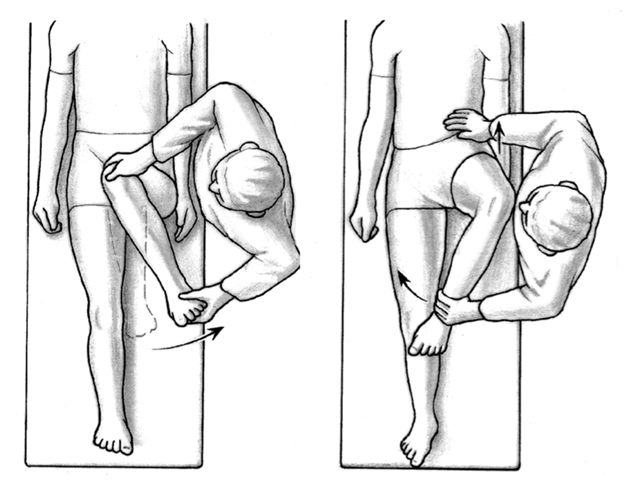
Your hips’ ability to rotate is very important for optimizing your athletic ability both on and off the ice.
It will help with all aspects of your skating technique, speed, and agility on the ice.
The Thomas test is a pretty decisive test for measuring hip tightness, so there really shouldn’t be any restrictions showing up as poor rotational ability.
If you have rotational restrictions, it means whatever is holding your hip mobility back isn’t a structural issue at the hip; instead, the issue lies elsewhere in the body, and the hip is compensating.
If you’ve spent years stretching “tight hips” with zero improvement, you’re running the wrong track.
You spent time working on compensation, not the root cause of the problem.
Seeing The Bigger Picture
If your muscle was actually tight, it should have been able to become less tight by now from all of your stretching efforts – and those gains in flexibility from stretching should be permanent if it was the appropriate move to make in your program (and if you actually did it every week).
But most likely, if you have had tight hips forever and have stretched them frequently with no success, they are likely hanging on tight to support your lumbar spine.
Enter: Plank Variations
The muscles that resist internal rotation of the hip are on the lateral aspect of the hip.
These muscles play the primary role in providing lateral stability of the spine along with the obliques, psoas, lats, and serratus anterior.
To simplify, this is where side planks come in.
Side planks stimulate and force these muscles to work together to help stabilize the spine in a lateral position that doesn’t allow for compensation mechanisms to kick in.
Therefore, resetting your hip and core in unison to work together and not in isolation.
Hanging leg raises are also good for this, but the side planks take the cake.
Furthermore, the muscles that resist external rotation are found in the medial and anterior portions of the hip – and these muscles are directly correlated to anterior core instability – which then forces the hips to compensate if they are weak.
Or to make things more simple once again, this is where normal planks come in.
When you do a plank with proper technique, your hip flexors will be held in a stretched position while your abdominals are working in unison with your obliques and glutes to provide quite literally the best spinal stability possible.
Pro Tip: To get the most out of your planks, contract your glutes throughout the entire duration of the set so that you force the hip flexors into extension, which makes this whole process work so much better.
I’ve Been Saying This Forever
I wrote an article on core training telling everyone that they need to work on their “inner-core” first before they do any of the fancy stuff because it’s your inner-core muscles that stabilize the spine to optimize movement and prevent injury.
In that article, I recommend everybody do plank variations for entire phases of training before moving on to new progressions.
I stand by those statements, and they remain as true as ever today. And yet so many coaches still miss this in today’s hockey strength and conditioning environment.
Knowledge is power; use these tools wisely, and you’ll become the best player out on the ice.
The hip should always be mobile; structurally, it has an incredible range of motion compared to other joints.
So, when there is a mobility restriction, it typically comes down to a lack of stability elsewhere in the body – most often the core.
It’s a tricky rabbit hole because low back pain can be caused by hip tightness, but the hip tightness is usually due to core instability.
But once you figure that out, you’re away to the races.
When you fix this issue, your hips should open up immediately because your spine has deemed it safe to do so.
From there, you can skate to your true ability and not your restricted ability.
Hockey-Specific Training Program
If you liked this article and want more content like this to take your hockey training to the next level, check out the Hockey Domination membership, which includes all the workouts and mobility drills you will ever need to reach your true potential in this sport.
Leave a Reply