
In this article, I’m going to break down the five best exercises to start including into your dryland hockey training program to get a nasty backhand.
The backhand is the shot that most hockey players struggle with more than anything else. Part of this is simply due to a lack of technical repetition (you perform slapshots, snapshots, and wrist shots far more often than you backhand in a standard practice or skill session), but part of this is also due to a lack in understanding the power highways and how these can be leveraged to improve your shot power.
The Hockey Power Highways
We have high-to-low power highways located on both the front of the body and the back of the body. Your front power highways run from opposite shoulder to opposite hip, whereas your back highways do the exact same thing but on the backside of the body.
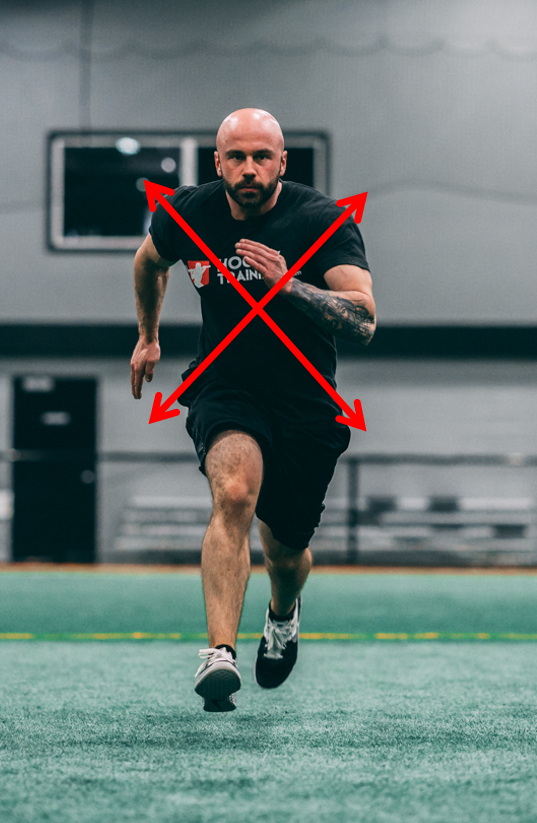
The cross-directional power highways.
Think of an “X” just like this in the front, and then an “X” of identical size and placement on the backs of your shoulders to your opposite glutes.
Both the front and the back power highways work in a coordinated agonist/antagonist pattern—whatever the front accelerates, the back decelerates, and vice versa.
To bring the power highways to life, let’s use the example of a left-handed player taking a slapshot.
From the standing position, the movement is accelerated initially from the left serratus anterior, which will then transfer high-velocity force in a cross-directional pattern on the front side of your body through your left external oblique, right internal oblique, and then ultimately dissipate within your right hip flexor/adductor complex.
The front side of your body created a cross-directional (left shoulder to right hip) accelerative effect that the back side of your body effectively decelerated utilizing the left lat, right glute, and right hamstring.
Hard to conceptualize? No problem; I recorded a video for you on this exact topic right here in case you’re a visual learner.
Biomechanically speaking, this diagonal acceleration and deceleration is an orchestrated event that is found in all hockey-specific movement training.
Everything from skating to shooting utilizes these pathways to simultaneously accelerate and decelerate so you can move at high velocities but still remain coordinated and in control.
The easy part is that the same muscles that decelerate your forehand shots are the same ones that accelerate your backhand shots.
This is where your exercise selection comes into play.
#1: Forward-Reaching Lunges
You probably didn’t expect to see a lower body movement in an article touting to improve your backhand shot power.
But a simple biomechanical assessment of the exercise clearly demonstrates plenty of posterior cross-directional activation, which is exactly what we are looking for to get the functionally specific result we desire.
For example, as you reach during a right forward-reaching lunge, you will be decelerating the body and loading the right hamstring and right glute to then allow the accelerators of the movement to concentrically contract and return you to your original position. Whereas your left lat will be maintaining your posture and ensuring you do not rotate your upper body.
This combination creates a very efficient way to get the cross-directional pattern we want while heavily incorporating the lower body—which is great, as much of our shot power is derived from our legs/hips and not our arms.
#2: Anterior Reaches and T-Stands
Perhaps again, you may be wondering why an exercise that looks like it trains balance belongs in a backhand shot article.
Yet again, the posterior dominance of this movement in combination with it being unilateral in design forces you to activate the cross-body musculature we need activated to improve our backhand.
I recommend starting off with the anterior reaches. Once you have mastered those, you can move on to the much more difficult variation, which is the T-stand.
These two exercises are a couple of the best “bang for your buck” movements in the entire hockey training game—because, yes, they train your backhand, but they are also absolutely fantastic movements for balance and edgework due to their positive impact on hip/ankle stability.
The key with these exercises is to go very slow; try to make your downward phase four to five seconds in length for every single rep you do.
The faster you go, the less you get out of it.
#3: Low-to-High Chop Variations
When you want to work on the accelerators of your forehand shots, do high-to-low chop variations. But when you want to work on the accelerators of your backhand shots, do low-to-high chop variations.
That simple change in sequence dramatically alters the exercise from an anterior-dominant movement to a posterior-dominant movement.
My favorite part is that it also trains the core in the exact same movement pattern you want, and anybody who knows their physiology knows how insanely important core power is for improving how much force you can generate in a shot.
For backhands, I find low-to-high cable chop variations to be best for development. However, if you do not have access to a cable tower, it is also perfectly acceptable to do medicine ball chops as well.
#4: Unilateral Row Variations
Incorporating row variations into your plan is a key factor in developing your backhand shot power. I find rows to be among one of the best muscle- and strength-building exercises in existence.
You’ll find plenty of people with big biceps and pecs who are actually very weak out on the ice, but you will never find a hockey player with a big back who is weak out on the ice.
The athletes focused on “mirror muscles” might impress a couple people on Instagram, but the hockey players who focus on back development are the ones who impress crowds, coaches, and teammates with their superior performance where it matters most.
This is important to care about because the previously mentioned reaching lunges, cable chops, and T-stands—although highly beneficial—don’t add the “horsepower” that’s needed in the upper body to create a deadly shot.
You can think about rows like the horsepower behind your backhand, where the previous movements are your accelerators and stabilizers.
I find staggered-stance cable rowing variations to be the best options for backhands specifically; however, I’ll include non-cable as well as bodyweight-only variations you can use for this category as well.
#5: One-Leg, One-Arm DB Romanian Deadlift
Although highly advanced and perhaps not applicable for all readers, this movement is likely the most well-rounded of the entire bunch.
It is an excellent lower body, core, and upper body exercise all packed into one that utilizes the exact posterior cross-directional pathways that we want to develop.
In terms of training specificity, this is an excellent selection for any hockey player looking to improve their backhand in a short period of time.
Hockey Backhand-Shot Power Workout (Ages 15+)
A1: Staggered-stance standing cable row x 8 per side
A2: Slow, single-leg anterior reaches x 10 per side
A3: Low-to-high cable chops x 12 per side
Rest minimally between exercises and 90 seconds between complete triplexes. Repeat for 4 total rounds.
B1: One-arm free-standing DB row x 8 per side
B2: T-stands x 10 per side
B3: DB forward-reaching lunges x 12 per side
Rest minimally between exercises and 90 seconds between complete triplexes. Repeat for 4 total rounds.
Youth Hockey Backhand-Shot Power Workout (Ages 8–14)
A1: One-arm towel row x 8 per side
A2: Slow, single-leg anterior reaches x 10 per side
A3: Medicine ball diagonal chops x 12 per side
Rest minimally between exercises and 60 seconds between complete triplexes. Repeat for 3 total rounds.
B1: Bodyweight renegade row x 8 per side
B2: T-stands x 10 per side
B3: Bodyweight forward-reaching lunges x 12 per side
Rest minimally between exercises and 60 seconds between complete triplexes. Repeat for 3 total rounds.
The Complete Solution
Learning the inner workings of the power highways from a physiological and biomechanical perspective can take a little time, and learning how to train it properly can take even more time.
If you’re confident and well-educated in the art and science of hockey training program design, you can take all of the information you have learned here and run with it to become a better hockey player this year.
But if you’re looking for a simple-to-follow, “done for you” formula that is guaranteed to work and takes all the pressure off, then you need to check out the brand-new In-Season Hockey Training Program. It’s an elite hockey training program I have created to simplify the process and take your entire game to the next level, no matter what age you are or what equipment you have access to.
If you’re serious about getting better and you’re ready to take the next step, click here and join the team this year.
Final Thoughts
As you know, the above article does not include all of the exercises I have my hockey players perform in their programming to improve their backhand (nor does it include all of the benefits of each particular exercise).
These are just some of my all-time favorites that I know can help hockey players who are struggling and want something new in their dryland approach to kickstart their progress.
This article has laid out the framework for how functionally specific hockey training can enhance every single aspect of on-ice performance.
Don’t just “lift weights.” Instead, have a rationalized approach for everything you do so you don’t get left behind by all of the people who do.
From basic definitions to biomechanical discussions of the cross-directional power highways, the information above allows you to better understand shot-specific training and how to better evaluate the current exercises that you’re doing.
Collectively, this sets the stage for your entire dryland approach.
To learn more about the periodization process, make sure you check this out and let us know if you have any questions!